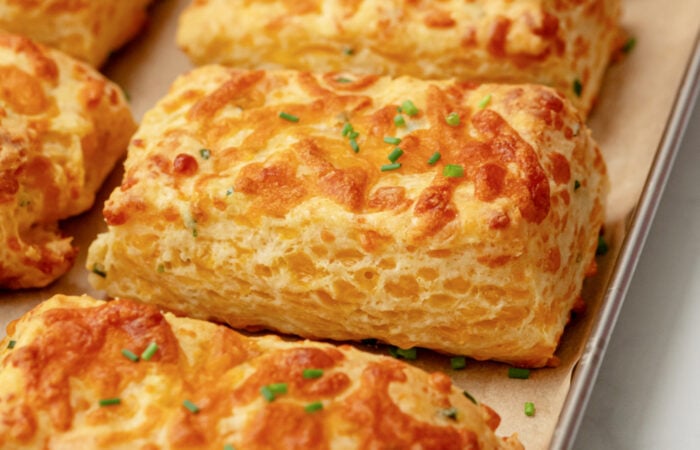
Buttermilk Cheese Scones

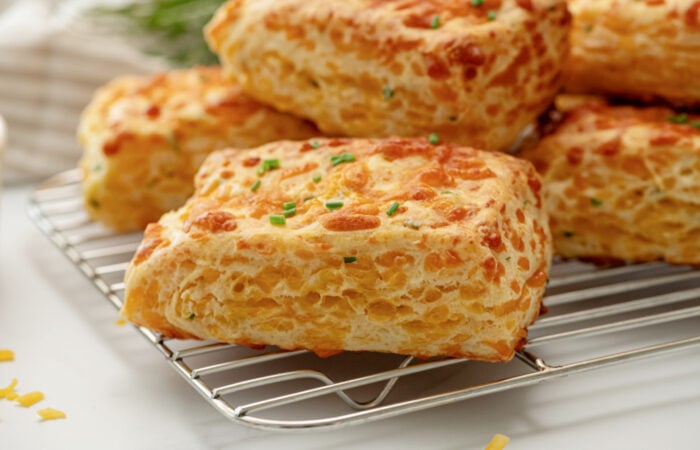
These Buttermilk Cheese Scones are the ultimate savory breakfast treat, boasting an incredibly light and flaky texture thanks to a folded dough technique that never fails! Packed with sharp cheese and fresh chives, they offer a deliciously rich flavor in every bite. They’re irresistibly good straight from the oven, topped with a golden, cheesy crust.

The trick to any good scone recipe is the use of cold, cubed butter which helps to deliver that signature flaky texture. I also love to use buttermilk in these savory cheese scones – it adds tangy flavor, creates a tender dough, and promotes the perfect rise. A brief chill before baking ensures the scones hold their shape, resulting in that desired contrast between the crisp, cheesy exterior and the soft, savory layers within.
Need a scone refresh to add some excitement back to your breakfast or brunch? I have you covered with these scrumptious Blueberry Scones, Whole Grain Pumpkin Scone with Frosting, or Orange Almond Scone Loaf Bread.

What are buttermilk cheese scones?
These cheese scones with buttermilk are going to become your new breakfast obsession, achieving a perfectly light and flaky texture through cold, cubed butter that creates steam pockets in the folded dough while baking in the oven.
The tangy buttermilk tenderizes the dough and activates the perfect rise, while the grated cheese and fresh chives create deeply savory notes that’ll have you reaching for your second scone in no time!
These cheesy scones are topped with a milk wash and sprinkled with extra grated cheese, then baked to a gorgeous golden brown with an irresistible contrast of a crisp exterior and soft, layered interior.
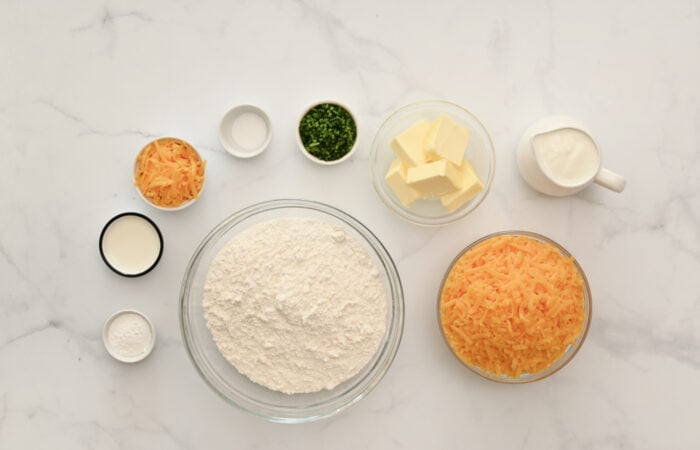
Ingredients needed to make buttermilk cheese scones
- All-purpose flour: My go-to flour for baking light and flaky scones. A gluten-free flour that is a 1:1 swap for regular flour could be used, although I haven’t tried it for these buttermilk scones.
- Baking powder: Reacts with the acidity in the buttermilk for the perfect rise.
- Salt: Balances and enhances the flavors in these cheese and chives scones. Reduce to 1/4 tsp if using salted butter.
- Unsalted butter: You’ll need to use cold and cubed butter for the scone dough to create steam pockets as it melts in the oven. This steam pushes the layers of dough apart, resulting in a light, flaky, and airy texture. If you use warm or melted butter, you lose this effect and get a dense, more biscuit-like scone. Salted butter works too, just reduce the salt called for in this recipe.
- Cheese: While any cheese will work, strongly flavored varieties like cheddar are ideal. For a more complex flavor, try mixing cheeses, such as pairing a mild Edam with a sharp Parmesan.
- Chives: The chives add a lovely subtle onion flavor to the scone dough which pairs beautifully with the savory cheese.
- Buttermilk: Buttermilk tenderizes the scone’s crumb, adds a pleasant tangy flavor, and activates the baking powder for a better rise.
- Topping: I’ve brushed the tops of these cheese scones with milk to create a golden-brown and glossy finish. Sprinkling the tops of the scones with a bit of cheese also adds extra cheesy flavor, melting ever so slightly over the edges – yummy!
How do you make buttermilk cheese scones?
Mix the dry ingredients:
- In a large bowl, whisk together the flour, salt, and baking powder until thoroughly combined.
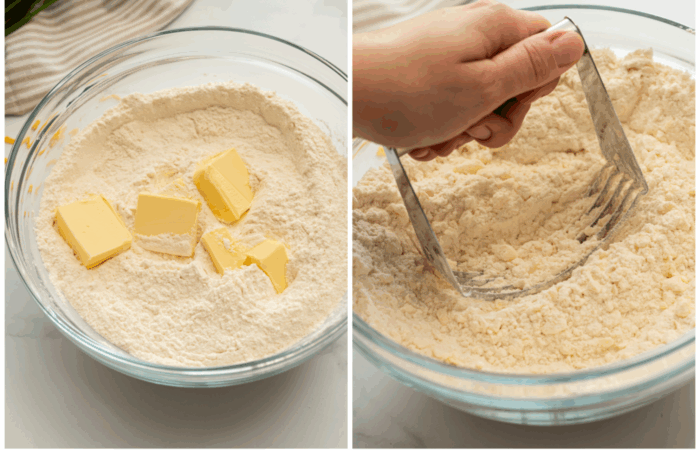
Cut the butter:
- Cut the cold butter into small cubes.
- Add the cubed butter to the bowl of dry ingredients.
- Using a pastry cutter or your fingers, work the butter into the flour mixture until it resembles coarse, pea-sized crumbs. It’s essential to work quickly to ensure the butter remains cold and does not soften.
Add cheese and chives:
- Add the grated cheese and chopped chives to the flour-butter mixture.
- Stir well to ensure they are evenly distributed throughout.
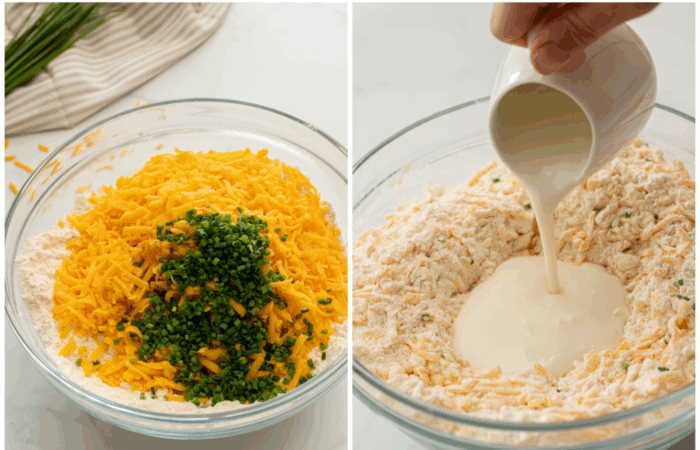
Combine with buttermilk:
- Create a well in the center of the flour mixture and pour the buttermilk into the well.
- Using a rubber spatula or wooden spoon, gently fold the wet and dry ingredients back and forth, switching to your hands to form a shaggy soft dough ball.
- If the dough seems too dry and does not come together, add a small amount of buttermilk, but be careful not to add too much that it makes the dough wet and sticky.
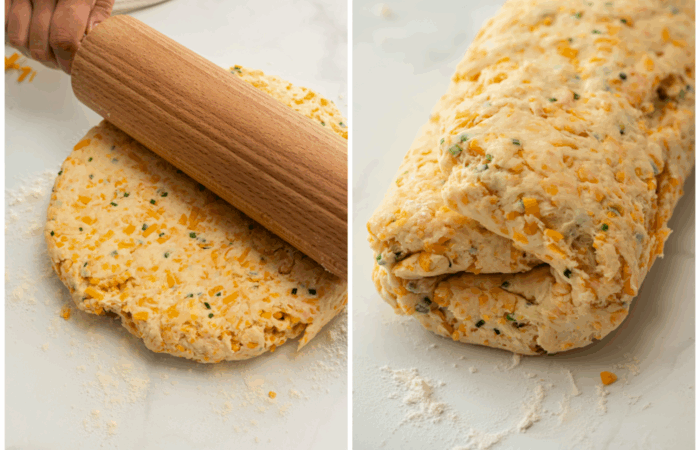
Laminate the dough:
- Place the shaggy dough on a lightly floured surface and gently press and form it into a ball.
- Using a rolling pin, roll the dough into a rough rectangle approximately 7×10 inches in size.
- Lift the top third of the dough and fold it down towards the center.
- Lift the bottom third and fold it up and over the first fold, as if folding a piece of paper.
- Rotate the dough 90 degrees. Roll it out once more into a 7×10 inch rectangle and repeat the folding process you did above.
- Repeat this rolling and folding process one final time, ending with a 7×10 inch rectangle.
Shape and chill the dough:
- Using a sharp knife, cut the dough into 10 equal pieces.
- Transfer the scones to a plate or tray and place them in the refrigerator to chill while you preheat the oven to 425 degrees F.

Bake:
- Line a baking sheet with parchment paper and arrange the chilled scones on the prepared baking sheet, leaving space between them.
- Lightly brush the top of each scone with milk and sprinkle with additional cheese.
- Bake for approximately 15 minutes, or until the scones are fully risen and have a golden-brown crust.

Serving
Enjoy buttermilk cheese scones warm for breakfast or brunch with a variety of jams and jellies, such as this easy Homemade Strawberry Jam. Grate some extra cheese and leave it to your guests to pile it onto their scones with some herb-infused butter.
Add these cheese and chives scones to a hearty breakfast lineup with a choice from Honey Pepper Bacon, Bacon and Gruyere Egg Bites, Blueberry Coconut Baked Oatmeal, or Coconut Yogurt Berry Breakfast Parfaits.

Sandy’s tips and substitutions:
- Storage: Store these cheese scones at room temperature in an airtight container for up to 2 days. Refrigerate for up to 1 week and freeze for up to 3 months.
- Make ahead: You can assemble the unbaked scones ahead of time and either store them in the fridge for a couple of hours (or overnight) or freeze them on a baking tray and then transfer them to a freezer-safe bag to freeze for up to 3 months. When ready to bake, place the from frozen into the preheated oven and add a few additional minutes to the baking time.
- Baking time: The baking time listed in this recipe if a guide only. Every oven is different, and the baking time will also be affected by how large you’ve cut the scones.
- Ingredient measurements: The cup measurements provided in the recipe card are US-sized. Since these can differ from metric cups, we strongly recommend using a kitchen scale and measuring by weight in grams for best results.
- Herbaceous twist: Swap the chives for any of your favorite herbs, such as dill, oregano, rosemary, thyme, or basil.

- Gluten-free: Use a 1:1 gluten-free flour blend and add 1/2 teaspoon of xanthan gum if needed.
- Buttermilk: If you can’t source buttermilk, make it by combining 225g milk (1 cup minus 1 tablespoon) with 15g (1 teaspoon) lemon juice or apple cider vinegar. These measurements will make slightly more buttermilk than what you need for these scones.
- Double the recipe: Bake on two trays when catering to a crowd, rotating the trays halfway for even browning.
- Freshly grated cheese: Always grate your cheese from a block as pre-shredded/grated cheese contains anti-caking agents that affect how it melts and also dulls the flavor.
- Cold butter: It’s really important to use cold, cubed butter to make the scone dough. Warm or soft butter will result in dense scones instead of a light and flaky texture.
More recipes that use buttermilk you may want to try:
- Cherry Buttermilk Cake
- Buttermilk Bran Muffins
- Chocolate Buttermilk Waffles
- Old Fashioned Buttermilk Biscuits
- Buttermilk Cornbread Recipe

Get the Recipe:
Buttermilk Cheese Scones

Ingredients
- 2 ¾ cups all-purpose flour
- 1 tablespoon baking powder
- 1 teaspoon salt
- ½ cup unsalted butter, cold and cubed
- 2 ½ cups grated cheese*
- 2 tablespoons fresh chives finely chopped
- 1 cup buttermilk, plus more if needed
Topping
- Milk for brushing
- Grated cheese
Instructions
- In a large bowl, whisk the flour, salt, and baking powder. Cut the cold butter into cubes and add it to the dry ingredients. Using a pastry cutter (or your fingers) cut the butter into pea-sized crumbs. Make sure and do this while the butter is cold, so it doesn’t melt.
- Add in the grated cheese and chopped chives and stir well.
- Make a well in the flour mixture and pour in the buttermilk. Using a rubber spatula or wooden spoon, fold it back and forth, switching to your hands to form the dough into a shaggy soft dough ball.
- Add in a little milk if the dough is too dry, but don’t let it get too wet or sticky.
- Place the dough onto a lightly floured surface, forming it into a ball. Use a rolling pin to roll out into a rectangle of about 7×10 inches.
- Lift the top third of the dough and bring it into the middle. Bring up the bottom third of the dough and fold this over like you’re folding a piece of paper.
- Turn the dough 90°, then push or use a rolling pin to push it into another 7×10 inches rectangle. Fold it up once more.
- Repeat the process one last time into a 7×10 inches rectangle.
- Use a sharp knife to cut the dough into 10 pieces for smaller scones.
- Place the scones in the refrigerator while preheating the oven to 425 F.
- Line a baking sheet with parchment paper. Place the cold scones on the prepared baking sheet.
- Brush the tops of the scones with milk and top them with a bit of cheese. Bake for around 15 minutes until golden brown.


Hello and welcome to my home and table!
I’m Sandy—lover of food, family, cooking, THE BIG BOARD, travel, and bringing people together. Through great recipes and connection around the table, we become better, stronger, and more courageous people. Feasting on Life is real, and every time we do it, we grow a little more. Read more...